Introducción al servidor web Arduino
En este post te mostramos cómo implementar un proyecto Arduino Servidor Web en los PLCs basados en la automatización de Arduino. El requisito para este ejemplo es solo un PLCsbasados en Arduino con conexión Ethernet (Arduino web server ethernet shield).
Requisitos para implementar un servidor web Arduino
Ethernet PLC Arduino: Productos de la familia MDuino
Librería Ethernet2 : Librería Arduino Ethernet2.h
Configuración
M-Duino requiere una fuente de alimentación para hacer funcionar la placa Ethernet y el cable Ethernet.
Debes seleccionar las direcciones IP y Mac. En este ejemplo son: IP = 192.168.1.219 y Mac = 0xDE, 0xAB, 0xBE, 0x15, 0x00, 0x01.
Este servidor web es un servidor web Arduino simple que permite alternar el Pin Q0.0 de M-Duino. Usando el puerto TCP 80 y el protocolo HTTP, nuestro servidor web estará escuchando a través de este puerto esperando un cliente. Una vez que hay una solicitud del cliente, se llama a la función togglePin () y se activa Q0.0. De lo contrario, el servidor mostrará un mensaje de error apropiado al cliente.
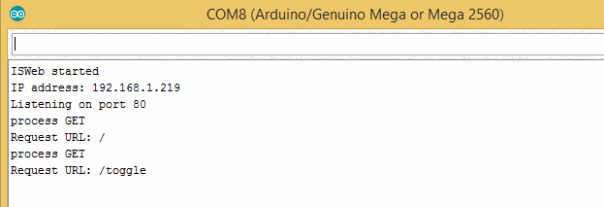
Una vez cargado el sketch, abre el Serial Monitor en Arduino IDE para saber si el setUp ha tenido éxito:

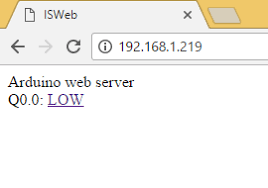
¿Cómo conectarte al servidor? Simplemente abre tu navegador y escribe la IP del servidor. En este ejemplo es 192.168.1.219:
Mira la siguiente imagen del servidor web de Arduino:

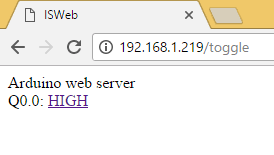
A continuación, puedes pulsar LOW para cambiar el pin Q0.0 a HIGH:

Software
El código para implementar este servidor web de Industrial Shields Arduino HTML CSS se muestra a continuación:
/*
   Copyright (c) 2017 Boot&Work Corp., S.L. All rights reserved

   This program is free software: you can redistribute it and/or modify
   it under the terms of the GNU Lesser General Public License as published by
   the Free Software Foundation, either version 3 of the License, or
   (at your option) any later version.

   This program is distributed in the hope that it will be useful,
   but WITHOUT ANY WARRANTY; without even the implied warranty of
   MERCHANTABILITY or FITNESS FOR A PARTICULAR PURPOSE.  See the
   GNU Lesser General Public License for more details.

   You should have received a copy of the GNU Lesser General Public License
   along with this program.  If not, see <http://www.gnu.org/licenses/>.
*/
//If using V7 versions you have to include instead the following library: #include <Ethernet.h>

#include <Ethernet2.h>

#define TCP_PORT 80

// Digital output
int pin = Q0_0;
int value = LOW;
int _numDigitalOutputs = 1;

uint8_t _mac[] = {0xDE, 0xAB, 0xBE, 0x15, 0x00, 0x01};
byte IP[] = {192, 168, 1, 219};

EthernetServer _server(TCP_PORT);

////////////////////////////////////////////////////////////////////////////////////////////////////
void setup() {
  Serial.begin(9600L);
  Serial.println("ISWeb started");

  pinMode(pin, OUTPUT);
  digitalWrite(pin, value);

  Ethernet.begin(_mac, IP);
  Serial.print("IP address: ");
  Serial.println(Ethernet.localIP());

  _server.begin();
  Serial.print("Listening on port ");
  Serial.println(TCP_PORT);
}

////////////////////////////////////////////////////////////////////////////////////////////////////
void loop() {
  EthernetClient client = _server.available();
  if (client) {
    String requestType = client.readStringUntil(' ');
    String requestUrl = client.readStringUntil(' ');
    String requestVersion = client.readStringUntil('\n');
    String response;
    if (requestType == "GET") {
      Serial.println("process GET");
      Serial.print("Request URL: ");
      Serial.println(requestUrl);
      if (requestUrl == "/") {
        response = createResponse();
      } else if (requestUrl.startsWith("/toggle")) {
        togglePin();
        response = createResponse();
      } else {
        response = create404();
      }
    } else {
      response = create404();
    }
    sendResponse(response, client);

    client.stop();
  }
}

////////////////////////////////////////////////////////////////////////////////////////////////////
String createResponse() {
  String content =
    "<!DOCTYPE html>"
    "<html>"
    "<head>"
    "<title>ISWeb</title>"
    "</head>"
    "<body>"
    "Arduino web server IS<br>";

  content += "Q0.0: <a href=\"/toggle\">";
  content += value == HIGH ? "HIGH" : "LOW"; // if value = HIGH print HIGH, else print LOW
  content += "</a>";

  content +=
    "</body>"
    "</html>";

  return createResponse(200, content);
}

////////////////////////////////////////////////////////////////////////////////////////////////////
String create404() {
  return createResponse(404, "404 Not Found");
}

////////////////////////////////////////////////////////////////////////////////////////////////////
String createResponse(int statusCode, const String &content) {
  String response;
  switch (statusCode) {
    case 200:
      response = "HTTP/1.1 200 OK\r\n";
      break;
    case 404:
      response = "HTTP/1.1 404 Not found\r\n";
      break;
    default:
      response = "HTTP/1.1 500 Internal server error\r\n";
      break;
  }

  response +=
    "Server: ISWeb\r\n"
    "Content-Type: text/html\r\n"
    "Connection: closed\r\n"
    "Content-Length: ";
  response.concat(content.length());
  response += "\r\n"
              "\r\n";
  response += content;
  return response;
}

////////////////////////////////////////////////////////////////////////////////////////////////////
void sendResponse(const String &response, EthernetClient &client) {
  client.print(response);
}

////////////////////////////////////////////////////////////////////////////////////////////////////
void togglePin() {
  if (value == HIGH) {
    value = LOW;
  }
  else {
    value = HIGH;
  }
  digitalWrite(pin, value);
}